All posts by Long Zheng

Using Google Photos for unlimited IP security camera off-site storage

I recently upgraded my home internet from a measly 2Mbit upload to a more respectable 40Mbps on the Australian National Broadband Network. I’ve been thinking of good uses for this newfound upstream bandwidth and one idea was to off-site my IP security camera footage.

I’ve previously used cloud surveillance storage services like CameraFTP but the retention time (how long the photos are stored) were limited to 7 or 30 days, the UI was clunky and slow and the pricing seemed exorbitant for what is essentially just a few MB of storage quota.

Then I remembered Google Photos where I recently backed up around 300GB of family photos and videos. It’s free and unlimited storage (for 16MP), easy to upload and browseable from anywhere on desktop and mobile.

Now all my security camera images are stored on Google Photos with infinite retention for free!

I have a D-Link DCS-2330L wireless outdoor security camera connected by WiFi. I’ve set up the camera for motion-detection and to upload images on a Samba network folder shared from my Windows NAS. Most IP cameras should have the ability to upload to a  network share.

I created a whole new Google account so it wouldn’t clutter up my typical photo library. The beauty of Google Photos on the web and the mobile app is that I can switch between the accounts in the account switcher instantly without logging out.

On the NAS I installed the Google Photos desktop uploader and pointed it to my images folder and let it do its thing. It seems to prioritize uploading the latest photos before filling the back catalog which is handy.

Last but not least I’m running a daily scheduled task of a simple Windows batch script that automatically clears out the shared folder for folders older than 30 days so it doesn’t continuously fill up the hard drive.

forfiles /p "D:\Security camera\" /d -30 /c "cmd /c if @isdir==TRUE rd /s /q @path"

And that’s it. Hopefully this simple guide inspires some other people as well to store their security camera photos off-site on Google Photos as well.

Hands on with the Elgato Eve HomeKit devices

The house I live in isn’t very smart, there’s no color-changing light bulbs, no intelligent assistance speaker and no internet-connected thermostat.

In late April, Elgato launched the Eve Energy smart power switch in Australia alongside an existing set of Eve Homekit devices. I got a chance to try out the Energy switch, Room indoor sensor and Door & Window contact sensor to see if you can teach an old house new tricks.

Eve Energy power switch

The Eve Energy is a remote-controllable switch and power meter that sits between a plug and the wall socket. It has been available in the US, EU and UK for a while now and an Australian version was recently made available to fit the Australian Type I socket.

Setting up the Eve Energy was quite a breeze, as I would suspect most HomeKit devices. It shows up when you’re near it, you scan an unique code on its side and you’re done. After it’s been set up, it will show up in the Apple “Home” app as a simple toggleable on/off icon. You’ll have to download and install the custom “Eve” app to access more detailed information.

As I’m anticipating installing a Tesla Powerwall 2 to extend my existing solar power system, I’ve always been keen to understand the energy usage and patterns inside the home. The Eve Energy makes it quite easily to see not only real-time usage but also historical usage and patterns over time.

It was interesting to know the home entertainment system (TV + Apple TV + Sat receiver + Bluetooth speaker) used 9Wh in standby and around 130W in use. The app has a built in cost calculator using the market rate of electricity. The TV costs an average $0.70 a day to run.

I was pleasantly surprised at how responsive the Eve Energy is to commands. I took a video at just how quickly the switch turns on and off in response to toggling it in the Home app, at most 2 seconds and usually a second.

What I found troubling is that the bulky size of the unit means that for a typical Australian duo wall socket, it blocks all usability of the other port which is a bit of a shame. I worked-around the problem with a power board but it would have been nice if it protruded a bit more outwards so another plug can fit underneath it in a way.


Eve Room indoor sensor

The Eve Room is a standalone temperature, humidity and air quality sensor for indoors. It too was a breeze to set up with just two AA batteries. The compact puck size makes it quite convenient and elegant to place in most locations around the home.

Once up and running, the Room collects data at 10 minute intervals. While tempreture and humidity are self explanatory, the “air quality” sensor is actually a volatile organic compounds (VOC) sensor that measures gases associated with bad air quality stemming from furniture, human breathing, household supplies, chemicals and plastics.

While the Room does not specifically measure CO2 (so it can’t be used to prevent carbon monoxide poisoning), there is some evidence that excessive VOCs cause irritations and “sick building syndrome”.

The Eve app makes it possible to see all three metrics over time. It was particularly interesting for me to see the air quality degenerating every evening as all the doors and windows are closed without much circulation.

Unfortunately it’s not possible to set up any alerts or triggers on the information such a warning if the air quality exceeds any dangerous threshold which would have been a nice reminder to open a window or something.


Eve Door & Window contact sensor

Last and perhaps the least in terms of functionality is the Eve Door & Window sensor. It’s a simple two-piece magnetic switch that senses when it is closed (near contact) or open. And as the name suggests, it can be attached to doors and windows.

Like the other devices, this was once again super easy to set up in HomeKit, pop in the battery, stick on the door frame and go. The accuracy is very good even if the sensors aren’t perfectly aligned or close together. The wireless range is also remarkable since my Apple TV is at least 10 meters away and it sends updates in less than a few seconds.

Besides being able to see if the door is open or closed at any time, you can set the Home app to send you a notification every time the door was opened and closed (which is thankfully off by default). Unfortunately the technology doesn’t yet exist to actually open or close the door at the tap of a button.

Although I have personally not found any good use cases for the door sensor, I can imagine the notifications being useful for parents who want to make sure kids are home at a certain time or setting up an automated action when the door opens to turn on some smart lights automatically.

Conclusion

The Elgato Eve suite of devices are super easy to set up and work exactly as they intended to. At A$85 a pop for the Eve Energy smart switch, it’s a bit pricey to pop one on every socket but it’s a pretty affordable smart power meter to understand energy usage around the home.

Unfortunately to do some more exciting automation such as turning on/off lights when I enter or leave the home or heating up the house when I’m about to come home, I would need a lot more HomeKit-enabled gear such as power switches, light/light switches, locks and thermostat.

For now, my house is just starting kindergarten.

Disclosure: Elgato provided the Eve devices for free as part of the review.

Learnings from my Ionic 2 myki app experiment

It’s been a while.

​Earlier this year, I started a hobby project to design, develop and publish a mobile app using the Ionic 2 hybrid mobile app framework. After all, if you’re not learning a new Javascript framework every few months you’re not a real web developer.

What started as just a simple learning exercise has turned into an eye-opening experience about modern web frameworks, hybrid mobile apps, publishing to Google Play and the App Store. I thought it might be useful to share some of my learnings and source code.

The app: unofficial myki app

As I take public transport every weekday, the app I spent about two weeks developing is called “mypal”. It’s an unofficial mobile app for myki – the contactless public transport ticketing system in Melbourne.

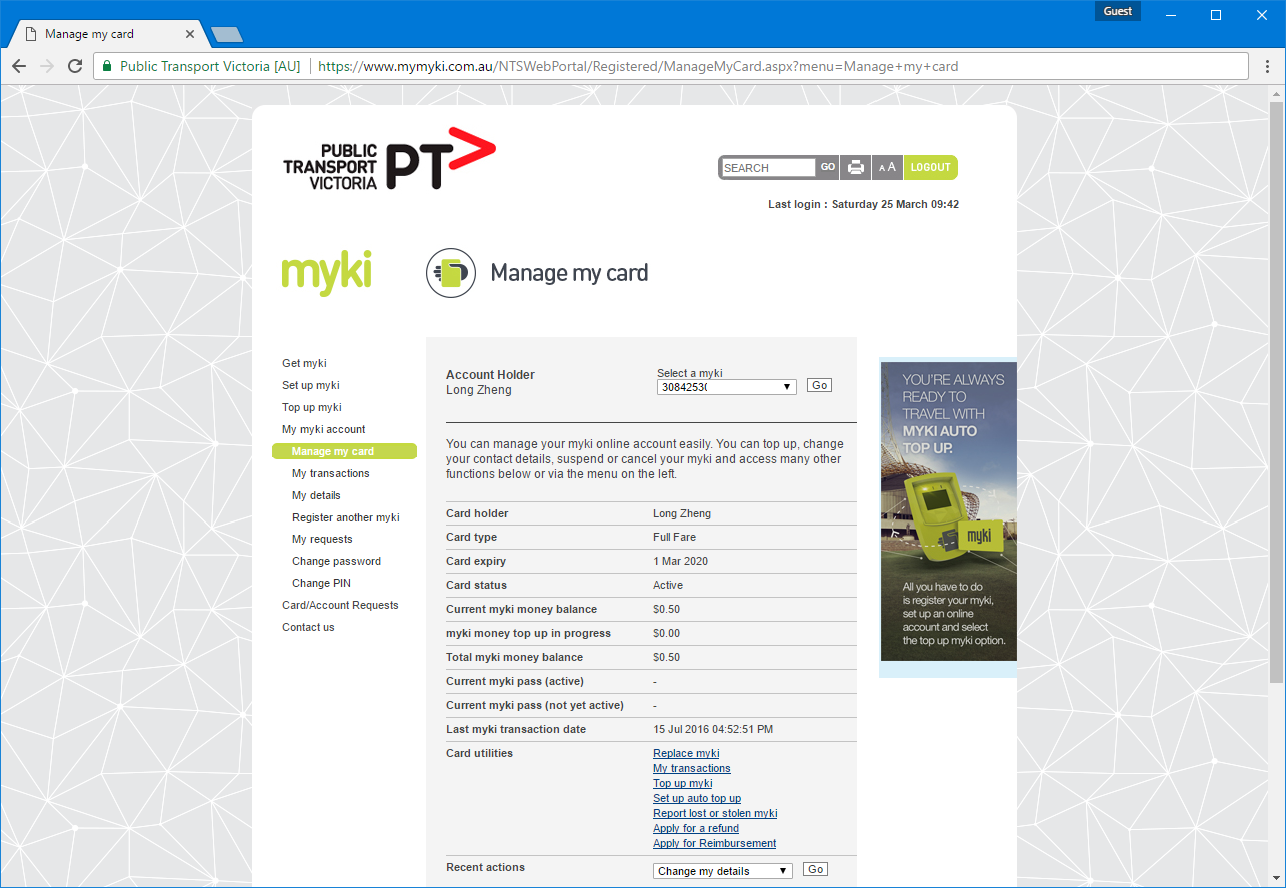
Without an official mobile app or even a responsive mobile site, I wanted to make a mobile-friendly interface to the archaic ASP-powered web portal with tiny form inputs, unintuitive menu options and 90’s web formatting.

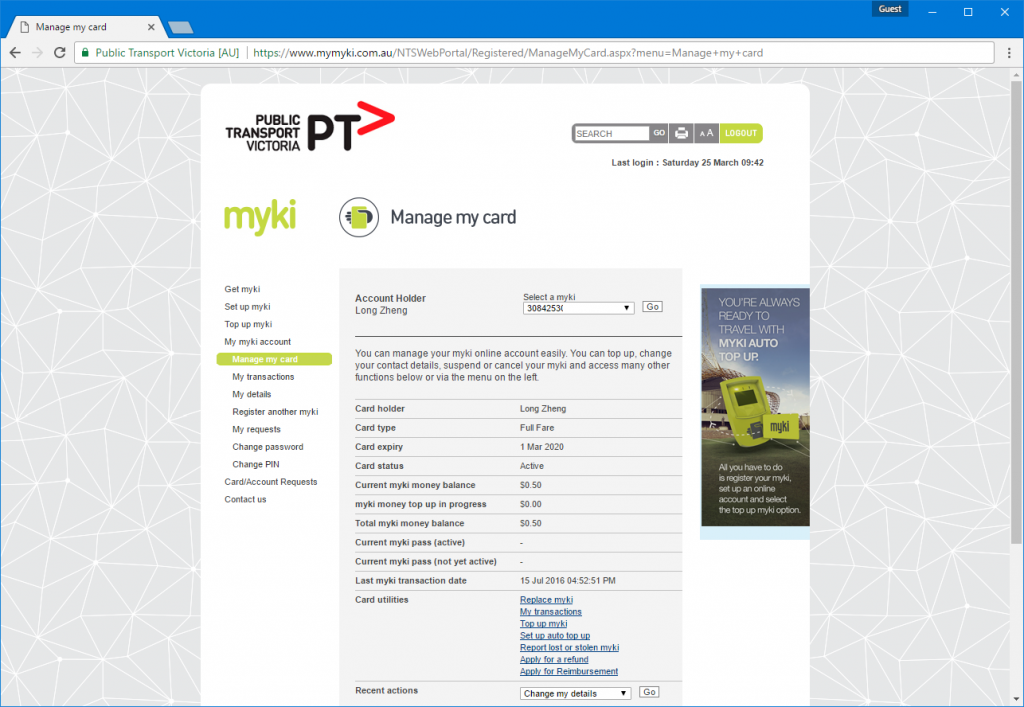
If you live in Melbourne, you’ve probably witnessed this atrocity

While there are a couple myki apps on Android and an app on iOS that lets you top up myki (among many services), none of them were designed very well. I wanted to make it beautiful.

Brute force scraping an ASP.NET site in Javascript

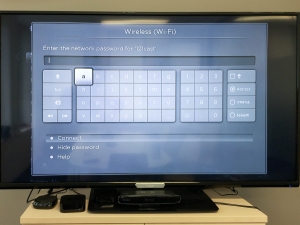
Security was one of my most important concerns when developing this app. I decided early on that I did not want to store or proxy any account logins or data on a server that could be vulnerable to security breaches. I wanted everything in the client on the phone, as if the user was interfacing with the myki site directly.

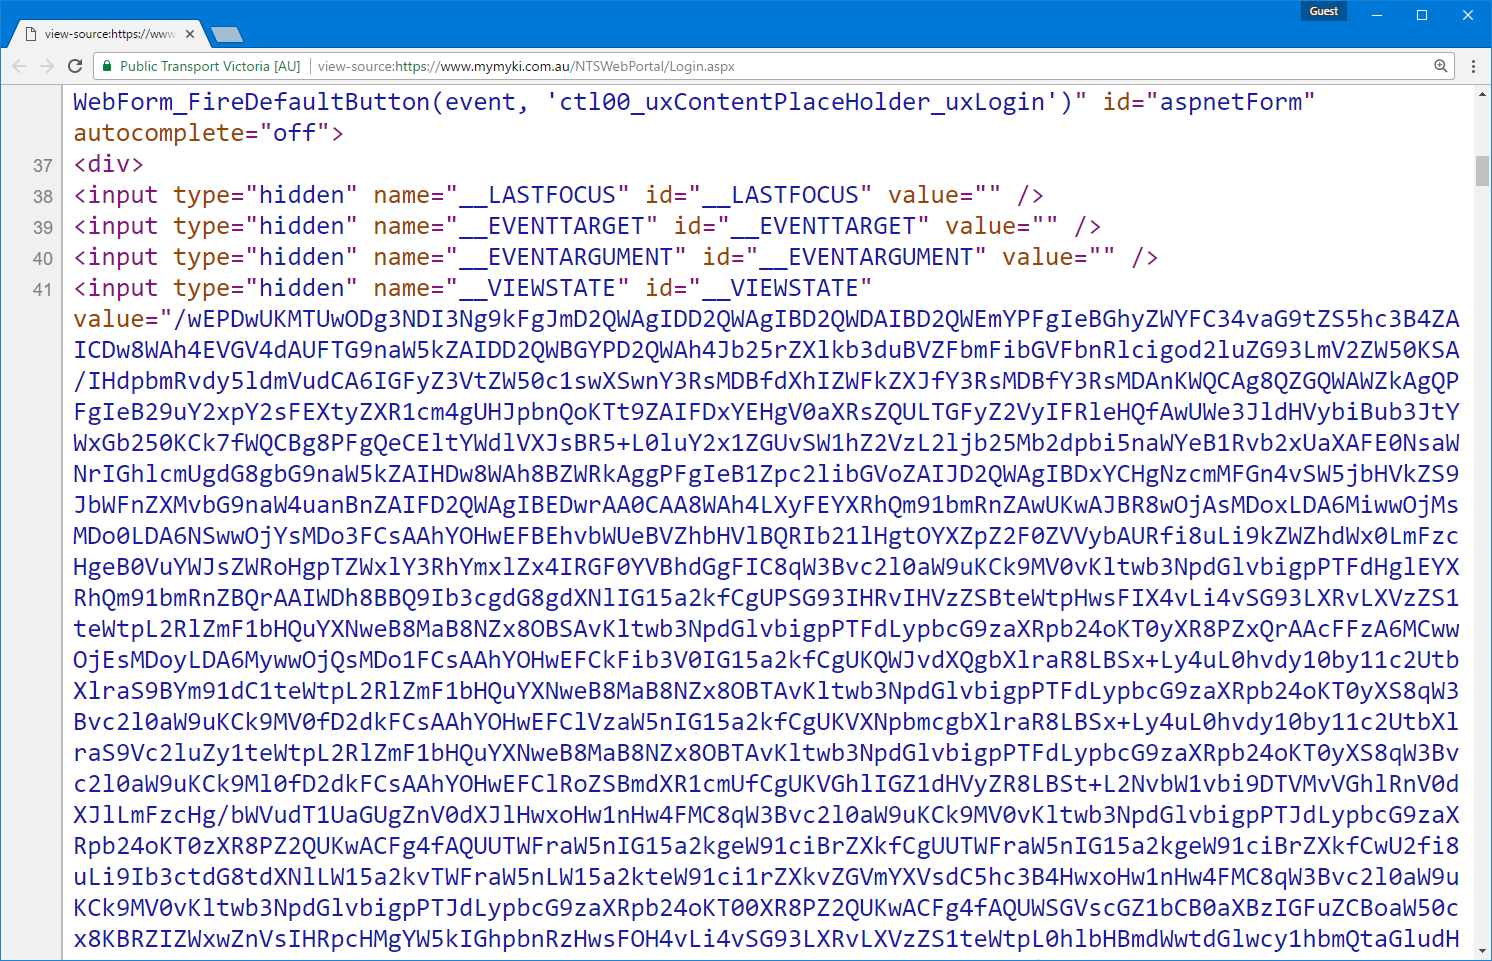
However the myki site doesn’t have a public API or even have any sort of API endpoint it uses internally. All the pages are served by ASP.NET postbacks with the hallmark __VIEWSTATE and __EVENTVALIDATION hidden form fields on the page. A large part of the complexity in the app’s codebase is actually dealing with maintaining page state.

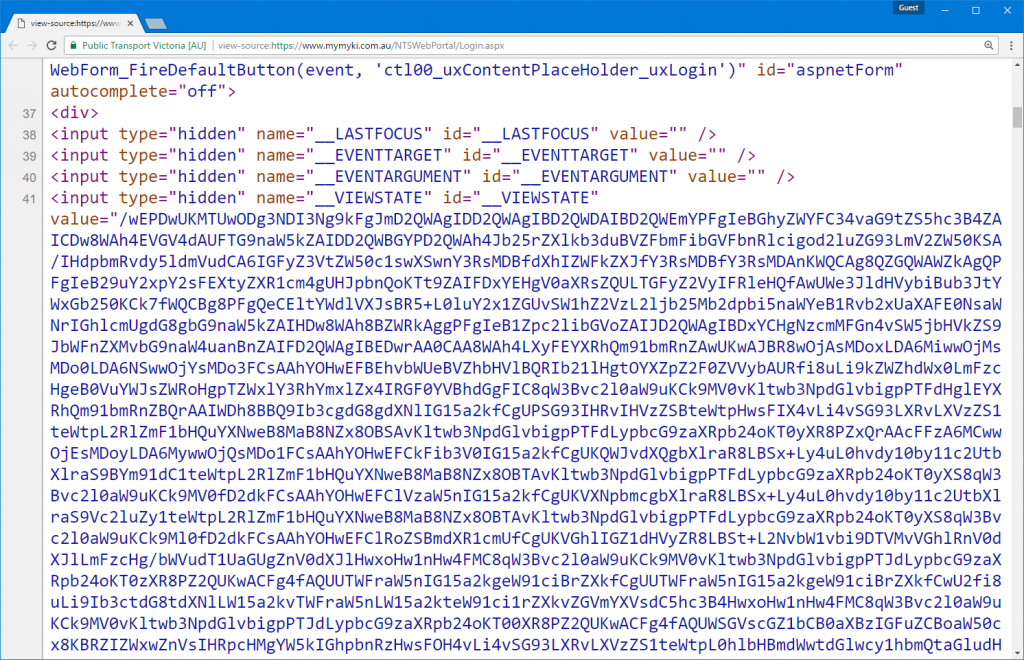
Figuring out how everything works is pretty much a case of brute force trial and error. I would look at what GET requests my browser was making and what subsequent POST requests was being made with what form fields. From there it was a process of elimination to figure out which were the minimum necessary form fields I needed to submit to get the pages I wanted. Here’s an example of the fields I needed to POST to start a top up request

Brute force debugging when live credit card payments are involved is not fun. At one point my credit card number seemed to have gotten blocked, but thankfully that appeared to be a temporary security measure after submitted invalid data nearly a hundred times.

Scraping HTML was actually the easiest part in Javascript. I could simply create a pseudo HTML document with just a string of the contents. And then I can use jQuery’s find method to target elements with selector.

In a world of mostly RESTful APIs and authentication tokens, brute forcing a live production site like a blind moth makes you appreciate good documentation a little bit more.

Ionic 2 has come a long way since PhoneGap

As a bit of a mobile app aficionado, I have a natural soft spot for using native apps. They’re suppose to be faster, have butter smooth scrolling and be more synergetic with the platform of choice.

However when it comes to creating apps, getting two native apps for the price of one is just too good to pass up. The time, learning and portability savings of having a single business-logic codebase and ideally a single design/layout codebase is a compelling offer for someone like me who isn’t competent at both native iOS and Android.

My impressions of PhoneGap (pre-Adobe) in 2012 were pretty poor. Buttons were bevelled, tabs were bevelled, in fact almost everything had a bevel or shadow. It was obvious at first sight when an app wasn’t native.

Fast forward 5  years, I heard some buzz around Ionic 2. Ionic is a hybrid mobile development toolkit built on Cordova (PhoneGap post-Adobe). While it still relies on Cordova’s webview wrapper and native-to-JavaScript API interface, Ionic 2 provides its own slick CLI and build system, Angular 2 routing and templating, native-looking UI components, iconsets and Angular-ised Cordova API interfaces. It has all the hallmarks of a hip and trendy app framework.

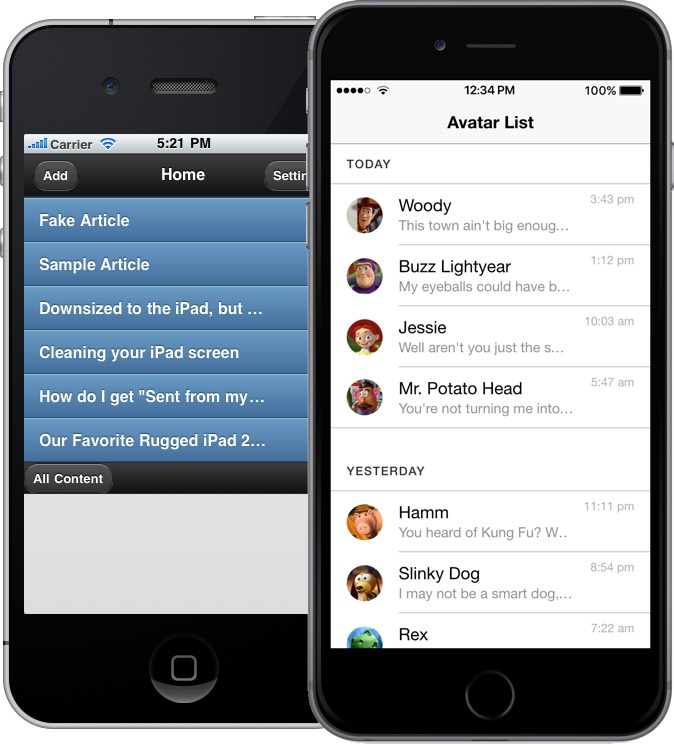
Left: an example PhoneGap app with default theme.
Right: an example Ionic 2 app with the default theme.

If nothing else, Ionic 2 does an amazing job at emulating a wide array of native controls for both iOS’s Human Interface Guidelines and Android’s Material Design with a single HTML component. I think most of the progress has only been made possible with the advancement and adoption of newer CSS standards that make some of emulated effects like animations, layouts and effects practical.

Of course there’s still some rough edges, like the alert dialog doesn’t look quite right and the select control is nothing like the iOS select picker. But if you were designing a generic line-of-business application, you get pretty damn close with just one frontend codebase.

Performance is also a bit of a non-issue. Both iOS and Android have significantly upgraded the performance of their web rendering engines and devices have also become a lot more powerful. App startup time is a bit longer on Android but nothing that should deter any users.

Developing a mobile app with HTML, CSS & Angular 2

The biggest draw for Ionic to me was HTML, CSS and Angular (and TypeScript).

And by HTML I actually mean HTML. While I’ve heard a lot of good things about React Native as well, writing pseudo HTML and CSS in Javascript (JSX) to me just seems like a recipe for a huge mess.

For me, HTML and CSS beats iOS’ storyboards and Android’s layouts by a huge margin. Especially since CSS flexbox have become much more mainstream, it’s now even easier to create adaptive layouts that change with screen size and proportions.

Ionic 2 is also dependant on Angular 2 which is nice hefty upgrade that makes Angular a bit more structured and performant. While the learning curve is steep (knowing Angular 1 probably makes it even worse), the native TypeScript support means everything is strongly-typed and documented. (TypeScript is easily Microsoft’s greatest contributions to the web development community)

Last but not least, I think debugging an Ionic 2 app is the cherry on top. Although I haven’t used Xcode and Android Studio extensively, from what I’ve witnessed the debugging tools in both leaves a lot to be desired.

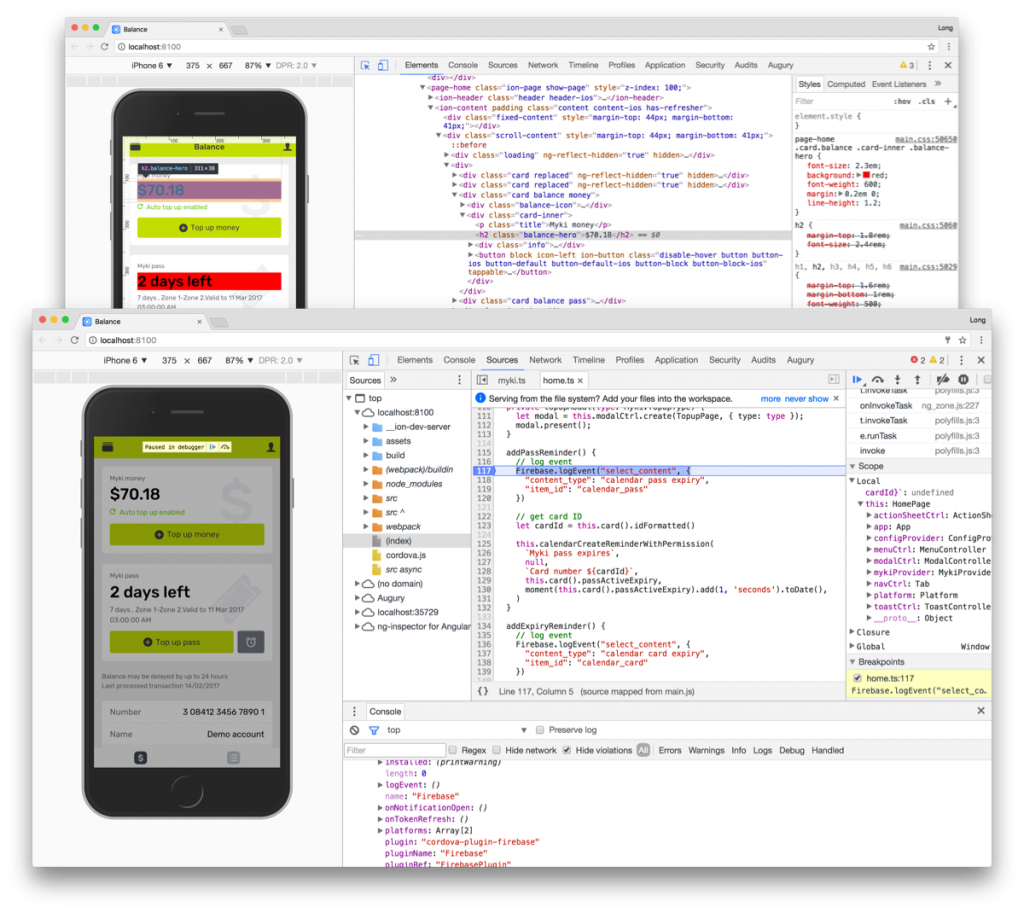
Debugging an Ionic app either running in the browser or running on a phone with Chrome’s DevTools is absolute bliss. Not only can I inspect and edit the HTML contents, CSS styles and Javascript live. The Ionic CLI also takes advantage of LiveReload to instantly refresh CSS changes without a new build or deployment. A pixel-perfectionist’s dream.

Publishing to Google Play

Although I don’t use Android day to day, it’s definitely enjoyable publishing Android apps.

I’ve helped publish apps to Google Play before so I knew it was easy – there’s no review process and you just have to fill out the bare minimum metadata and screenshots. But I was pleasantly surprised at just how intuitive the release management and beta organization process has become.

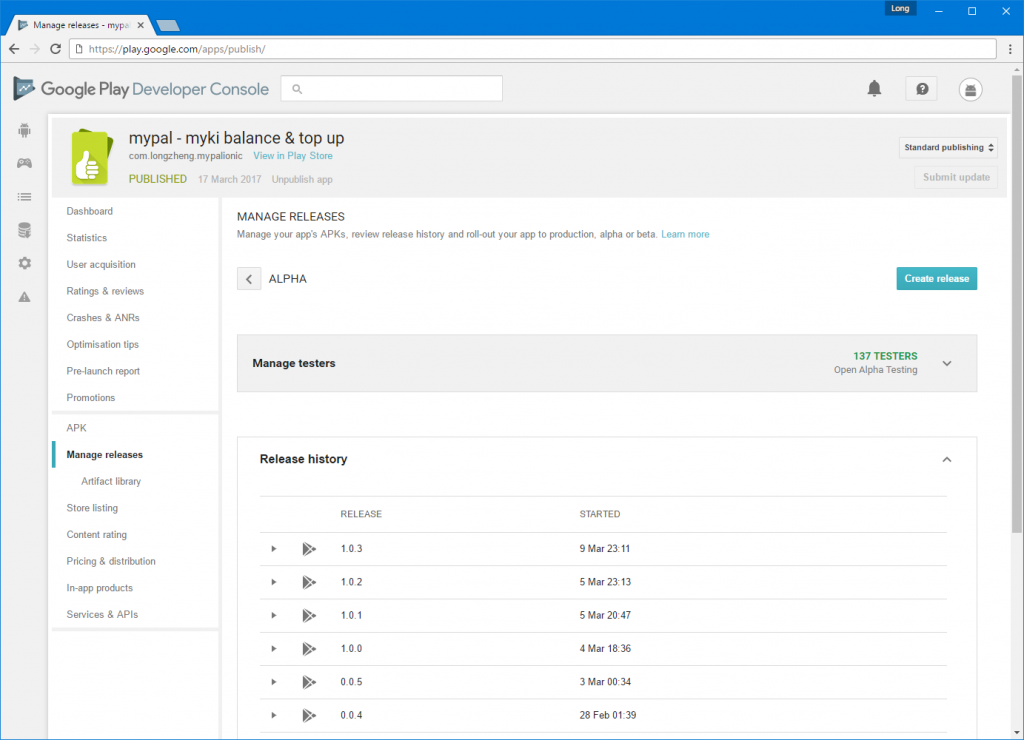
It was almost fun to upload new versions to testers.

Since i was eager for feedback, I uploaded an “alpha” release to Google Play and set it to an “Open Alpha Testing”. Lo and behold, over the next few days, dozens of people just randomly started installing my app. I never expected people actually installed random apps marked as “unreleased” from Google Play.

I even had 5 people submit beta feedback through the App Store, one of which actually reported and helped me debugged an edge-case scenario (with a special myki card type) I would have never encountered in my own testing.  Thanks David!

Publishing (or unable to publish) to App Store

For better and worse, the App Store is a double-edged sword and I find myself on the wrong side of the sword.

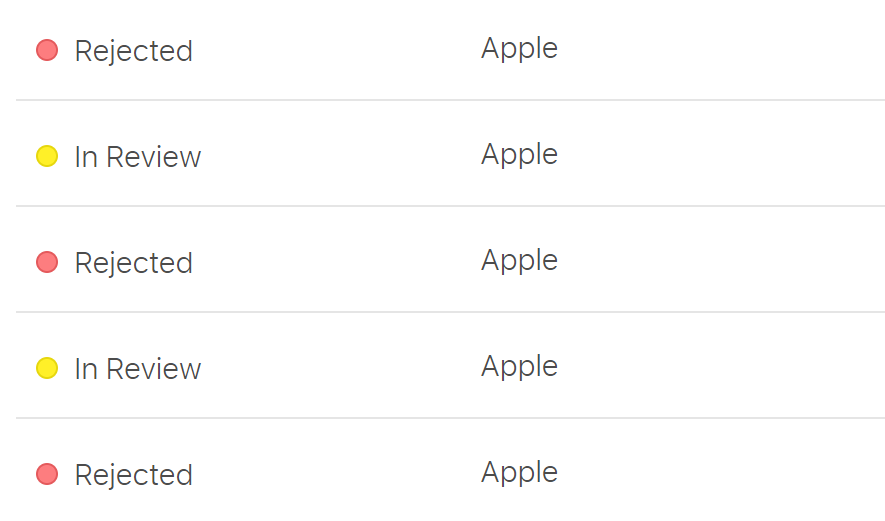
They say it gets easier with time, but it still hurts every time. (Screenshot edited for brevity)

After nearly a dozen emails back and forth with the App Store team as well as an half hour phone call with one of their representatives from HQ, it boils down to the fact that I’m not myki and Apple doesn’t want a third party to publish a myki app.

Specifically, Apple representatives have been quoting guideline PLA 1.2 which seems to be catching a few developers off guard.

The seller and company names associated with your app do not reflect the name “myki” in the app or its metadata, as required by section 1.2 of the Apple Developer Program License Agreement.

On one hand, I can sort of see where Apple is coming from. They don’t want any malicious apps that may be stealing people’s personal details claiming to be associated with a brand when in fact it’s not.

Having said that, there must be bucket loads of apps on the App Store that either uses APIs or similar scraping techniques to allow users to access private accounts in a third-party app not associated with the original organization.

In fact, there is actually an app called Pay24 already on the App Store that not only allows users to log in to their Myki account but also provides top up functionality by asking users to enter credit card details. Furthermore, the app also lets you access and top up a number of other service balances and I can only assume is not officially associated with all of them. When I asked the Apple representative why doesn’t this set a precedence, he said he couldn’t comment on other apps.

What’s even more confusing is that Apple themselves suggested me to remove the top up functionality which makes the app more “appropriate”.

It would be more appropriate to remove top up functionality from your App.

We hope you will consider making the appropriate revisions to your app and resubmit.

A few days later, without the top up functionality, it was rejected again. ¯\_(ツ)_/¯

Conclusion

I always love learning by building something practical. I’ve come to accept that hybrid mobile apps are not an alternative but more than good enough for a lot of line-of-business app requirements. Furthermore, Ionic 2 is a slick new framework that I would recommend to anyone looking to make a hybrid mobile app.

Although I doubt I’ll get anywhere, I’m going to see if I can get in touch with Public Transport Victoria (the government body that operates Myki) and see if they can give a seal of approval for my app to get it on the App Store. Regardless of the outcome, this was a fun, frustrating but overall rewarding learning experience.

If anyone wants to laugh at my (noobish) code, you can find it on GitHub.

First flights with the DJI Phantom 3 Professional quadcopter review

Drones/quadcopters are like the perfect synergy of my love for photography and technology. I treated myself to a DJI Phantom 3 Professional and it is easily one of the best gadgets I’ve owned for a long time (sorry Google Glass and Apple Watch).

Recent generations of quadcopters (people don’t really like the word drones) have made flying so much simpler and safer so. Combined with the advancements in GPS, sensors, smartphones and lithium ion batteries, it has become far more accessible than the remote controlled planes and helicopters of decades past.

The DJI Phantom is one of the more popular brands of quadcopters for photography purposes, the other being the Parrot Bebop but its fixed camera frame without a gimbal severely limits its photographic potential.

IMG_1080

Out of the box, the Phantom 3 Professional is not much wider or heavier than most laptops (at about 1.2kg). But don’t let its size fool you, this thing can fly fast and high with almost perfect levelling stability (of course the racing drones are more agile).

There is a bit of a learning curve to get comfortable with the control layout, various special commands, calibration and startup procedures (which performed incorrectly could cause the craft to drop out of the sky), but nothing any tech savvy user shouldn’t be able to figure out in a day.

From ground level, it can reach the maximum 400ft/120m altitude (for hobby operators in Australian controlled airspace) in less 30 seconds. While it’s in the air, it remained pretty much on the spot with winds of around 20km/h, if you don’t touch a thing.

IMG_8582

Four motors and blades produce a surprising amount of thrust that lets you maneuver it any direction with so much acceleration that I had to manually reduce the remote control’s sensitivity for more practical videos.

Up close, it’s definitely not discreet. Not only does it audibly make many loud beeps during its systems initialisation but when the blades are spinning, it sounds like a hovering hairdryer. However at a distance of about 30 meters (which is the recommended safe distance from other people and property in Australia), it is only subtly noticeable.

Of course with great power comes with even greater battery demands. I was able to get around 20 minutes of flying time on each battery which includes the roughly 5 minutes of safety buffer for return-to-home which is a safety function that can automatically fly the craft back to the takeoff position at critical battery levels. A second battery is pretty much required for any practical uses.

Controlling the quadcopter is a remote control that is remarkably efficient at 2.4ghz wireless transmissions over considerable distances. I was able to control and see the live video feed over 1km line-of-sight (the spec distance is up to 5km in FCC mode).

It connects to an iPhone or Android over USB cable to present the video feed along with telemetry data with the dedicated DJI app. Although the craft can technically be piloted without the app, there’s a lot of useful information and functionality that makes it pretty much essential.

IMG_1074

The app is also an enabler for some advanced “intelligent” flight modes which can semi-autonomously control the craft for some common maneuvers such as following the operator, circling a point and flying to defined waypoints.

There are also third party apps enabled by the SDK that provide even more refine semi-autonomous functions such as focusing the camera on a point while having full flight controls. The two most popular apps (Autopilot and Airnest) are two of the most expensive apps I’ve ever bought.

IMG_1063

Of course, the hallmark feature of the Phantom 3 Professional is the built-in 4K-video camera and gimbal which produces awe-inspiring 12MP photos with very little effort. It outputs 60Mbit bitrate UHD (4096×2160) at 24/25fps, 4K (3840×2160) at 24/25/30fps and 1080p at up to 60fps.

The camera on this system is actually the same camera DJI has on their professional-grade Inspire 1 quadcopter at 3x the price (the biggest difference is that the Inspire 1 has retractable feet so the camera can rotate freely, whereas the Phantom 3 must rotate the craft). It also captures in DNG RAW still format and LOG-color videos for professional color grading which takes some time and effort to post-process, but the results are worth it.

Take a look at these photos and video I captured last weekend:

DJI_0015

DJI_0025

DJI_0007

Unfortunately, like the GoPro, the camera has a fixed aperture lens which means the shutter speed can get ridiculously high on a bright and sunny day so a neutral-density filter is required to capture smoother cinematic-like video.

When it comes to the actual flying, the rules are a lot harder to understand than the controls. As one of my trained pilot friends joked, 90% of pilot discussions is about the regulations and only 10% is about flying.

Of course it doesn’t help that silly people have done dangerous things with remotely controlled aircrafts of all shapes and sizes, now there’s some pretty easy to understand guidelines in most countries now surrounding recreational unmanned aircrafts. However there’s still quite a bit open to interpretation, which is why you have to dig deeper into the actual laws and regulations.

I’ve already spent half a dozen nights reading and re-reading the Civil Aviation Safety Regulations Part 101, emailing the Civil Aviation authority for clarifications, and researching airspace and airport maps and I’ve only begun to understand the actual regulations in place for what is and is not allowed which is quite a bit more explicit and complete than the generalised guidelines. I would highly recommend anyone who is looking to fly in Australia to do the same.

The industry has also been pretty good at proactively adding safety features and limitations to its products to prevent dangerous and illegal activities. I expect the next generation of quadcopters to adopt many more sensors for obstacle avoidance so that even user-caused accidents like flying into people, property and objects can be prevented.

IMG_1083

If you’re somewhat serious about photography, then I highly recommend the DJI Phantom 3 Professional as a treat for the holidays. It beats the hell out of a selfie stick. Not only is it fun and simple to fly, it captures professional-grade photos and videos with very little effort. And like prosumer photography, prepare to spend a lot of money on accessories.

Hands on with Telstra TV: rebadged Roku for Aussies

When it comes to home entertainment technologies, Australia is playing a bit of a catch up. Netflix having just launched here less than 6 months ago and many new local streaming providers soon-after, Aussies are still finding their way around streaming entertainment services and devices.

One recently launched device is the Telstra TV, a rebadged third-generation Roku 2 set top box for Telstra’s Bigpond broadband customers.

There’s been some confusion to what Telstra TV actually is. It’s not a new streaming service (Telstra already has two, Bigpond Movies and Presto) and it’s not a replacement for Foxtel cable TV.

All it is, is a hardware device that connects to your TV and streams videos from third-party services. In fact, it’s a rebadged version of the Roku 2 standalone streaming player previously only sold in the US. Don’t worry, the little purple “Roku powered” tag on both the box and remote constantly reminds you in case you forget.

Out of the box, it’s a really simple product. It comes with a set top box, a remote, power plug, a HDMI cable and some very light reading material.

20151021_025838405_iOS 20151021_025943971_iOS 20151021_030125111_iOS 20151021_030243679_iOS

20151021_031039501_iOS

Since the third-generation Roku 2 (2720) was originally released in 2013 (and actually discontinued in April 2015), both the hardware and remote is starting to show its age.

The set top box is reasonably small, light and stylish enough to place on your TV which is very important since the remote is IR-based (not Bluetooth) so you have to point directly at it. It’s roughly the same size as the older Apple TV and a bit smaller than the new Apple TV.

Speaking of the remote, although I can appreciate its simplicity with only a handful of buttons but boy does it look dated. It’s shaped like a capsule which means it’s easy to spot and won’t fall into the abyss of the couch, but it also feels unnecessarily clunky.

20151021_030802457_iOS

Plugging in and setting up was surprisingly simple. After you connect to the Wifi network, you use a PC or mobile to activate your device and tie it to a Telstra account by entering the code displayed on the TV, saving you the pain of typing in emails and passwords with the onscreen keyboard and remote (never a good experience).

After activating you also get access to $15 credit on Bigpond Movies and 3 month subscription to Presto as a welcoming gift to stream some movies and TV shows for free.

20151021_031138369_iOS 20151021_031205203_iOS 20151021_080357038_iOS 20151021_080416843_iOS

A system update and a few app updates later, it’s all ready to go. From the home screen, you have access to the default apps including Bigpond Movies, Presto, Stan (coming soon), Netflix, Yahoo7, SBS On Demand, Channel 9 Jumpin and more.

20151021_082841314_iOS

Additional apps can be installed from the “Telstra TV Apps Store”. Unfortunately this is not the US Roku Store which has over 2500 apps and 60 games. At the time of writing, there were only 15 apps in the Telstra TV App Store which included YouTube, the Roku Media Player to access media on a USB device, TuneIn, Wall Street Journal Video, Vimeo, GoPro and etc. Useful third party apps such as Plex are notably missing. Telstra claims more apps will be coming however.

20151021_082918243_iOS

20151021_084110426_iOS

20151021_084200444_iOS

The UI is responsive and straightforward to navigate for a TV experience, but there’s not a lot of depth. Most apps lets you browse featured content on the home-screen, lets you find specific content in a search screen and browse for content by categories or genres.

Streaming video from Netflix and Bigpond Movies only took a few seconds to start but the quality is a bit jarring. Although the Telstra TV supports 1080p, videos from Netflix or Bigpond Movies didn’t look quite 1080p with subtle blocking and colour dithering. (I’m not 100% sure whether this is caused by the streaming services or the device)

In conclusion, Telstra TV gives you a simple and no-frills way to watch Netflix, Bigpond Movies, Presto, SBS On Demand and other popular Aussie streaming services on a TV, nothing too different from what most modern Smart TVs would already offer.

With the new Chromecast and fourth-generation Apple TV on the horizon, Telstra TV is unfortunately a generation or two behind in terms of the apps ecosystem and user experience.

If you’re getting Telstra TV free as part of a new Bigpond bundle contract, then it’s a good enough way to stream movies and TV shows on a TV without apps. But don’t go out of your way to buy one for $109.

Entering the cone of silence with Bose QC25 noise-cancelling headphones

I listen to a lot of podcasts, audiobooks and music on my daily commutes. I have been content with generic headphones for as long as I’ve owned phones and media players. I’ve always thought noise-cancelling headphones were a luxury only for long international flights, it never occurred to me just how big of a difference they can make even for a simple train trip.

I got my ears on a pair of Bose QuietComfort 25 Acoustic Noise Cancelling headphones for review a couple of weeks ago and now I can’t go back. The QC25 is like having my own portable cone of silence at the flick of a switch. (I’m a big fan of Get Smart)

IMG_0079

IMG_0078

IMG_0086

The headphones come in a carrying case, two colors (black and white) and two models: one made for Apple devices; and another made for Android devices. There’s no difference except the inline microphone & remote are optimized for each platform. In fact I suspect because it uses a standard 3.5mm TRRS conductor, it should be cross-compatiable with any modern smartphone.

The design and build of the QC25 feels solid and sturdy but weighs just 200 grams. The retractable headband is easy to adjust and holds its place firmly with thin etched slots. The rotatable hinges that allow the headphones to be folded into itself is metallic and covers the cord so it can’t be damaged. I throw these in my computer bag without the case day after day and they still look like new.

IMG_0084

The QC25 is one of the most comfortable over-ear headphones I’ve ever tried. Whereas some over-ear headphones I’ve tried actually clips my earlobes (and bruising them after extended use), the QC25’s elongated oval cups cover well-over the entire ear. The thick leather cushions form a tight seal around the ears, but it’s soft enough it doesn’t feel like it’s pressing hard against you.

As a subtle design touch, the letters “L” and “R” is textured on the fabric inside the cups making it dead simple to identify the correct orientation. (No you can’t wear it backwards)

I don’t claim to be an audiophile so I won’t bother with making up words to describe the bass, treble or any other technicality of sound, I’ll just say it sounds pretty good to me. What’s more important however is what sounds are not there, and that is where this headphone really shines.

Turning on the active noise cancellation is as simple as the flick of a switch on the right cup and it momentarily disables sound output, but the effect is instantly noticeable even without any audio being played.

Gone are the thumps of train wheels on train tracks, the high-pitched whine from electric train inverter, the over-enthusiastic passengers who love to chat and the roars of a diesel engine on a bus? Gone. You can still make out beeps of a train door closing, someone talking directly to you and the barks of a dog, but it’s significantly quieter. This headphone has been systematically rated as one of the best noise cancelling technologies available today and I don’t doubt that.

It’s not so much music or podcasts sound better with noise cancellation, but it’s all the extra details you hear when there’s no noise covering it up.

As a weird side effect, the pounding sound of your feet hitting the ground walking or running is accentuate so I don’t think noise cancelling headphones are ideal for jogging. The wind blowing towards you into the noise cancelling microphones also make for an unpleasant buffer sound.

Thankfully the headphones can be used like a normal pair of headphones if the battery runs out or you simply don’t want noise cancellation. Each battery is rated for 35 hours of noise-cancelled listening and so far I’ve only drained one by leaving it on overnight which can be a bummer.

IMG_0087

The worst thing about the QC25 is the unnecessary long cable – it’s roughly 50% longer than Apple’s Earpod cables. I know it’s an odd thing to say about a pair of headphones, but the dangling cable is a real nuisance. It flails about when I’m walking and I have to tuck a good portion of it in my pocket where the magical knot-fairy does its best work. There’s scientific proof longer cables have a higher knot probability.

In conclusion, this pair of headphones is a sizeable investment at a retail price of AUD$399/USD$299.

If you do a lot of listening out and about on public transport and especially on planes, the QC25 seems to be the state-of-the-art for active noise cancellation. Other reviews seem to suggest there are higher quality sounding headphones at this price range on the market, but I’ve fallen in love with listening in peace.

Disclosure: Bose provided the QC25 headphones for free as a gift.